
A gap under a sliding screen door is fixed only when the bottom closes as designed and the panel still slides securely in its guides. Lowering the frame until the opening disappears can create scraping or leave the top poorly engaged.
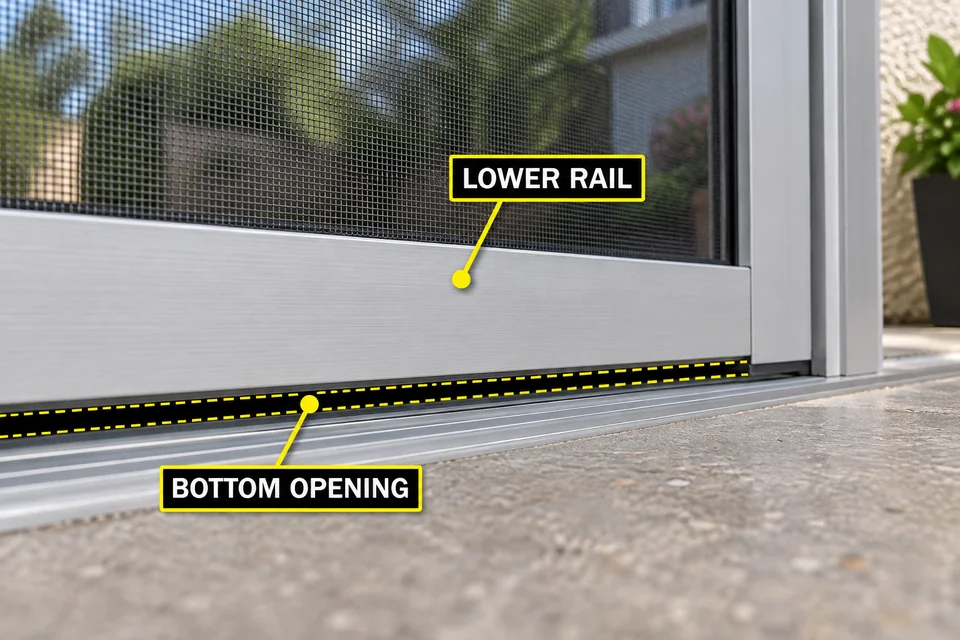
Start by identifying what should close the bottom opening: the frame’s overlap with the track, an original bottom insert, or another detail specific to the door. A panel set too high may need a small adjustment. A missing component or incompatible replacement screen needs a different correction. Inspect the lower rail and track together before turning screws or adding material.
The Likely Causes of a Continuous Gap Between the Lower Rail and Track
First establish whether you are seeing an open passage or simply the clearance the screen needs to move. A shadow beneath the rail can resemble a gap even when an overlapping track lip or original closure sits behind it. Inspect from both sides where accessible before deciding that the space needs filling.
For an unintended continuous opening, prioritize what changed. An opening that followed adjustment suggests a height-setting issue. One that appeared after removal and reinstallation warrants checking seating. A replacement screen that has never fitted correctly raises a different question: whether its dimensions and hardware suit the existing track.
Some designs use a bottom brush or other original closure component. If yours does, a missing or displaced insert can leave an opening even when the frame height is correct. Do not assume every sliding screen has—or should have—that part.
Roller wear needs careful interpretation. On a bottom-rolling screen, lost roller support generally lowers the panel rather than creating a uniformly higher bottom opening. Wear may affect alignment or stability, but the gap alone does not establish roller failure. Top-hung screens use a different support arrangement, so identify the design before applying adjustment advice.
Checks to Make Without Removing the Entire Assembly
Inspect the screen in the position it actually occupies during use. Close it without lifting the handle or forcing the latch. From a low angle, locate the screen’s own track rather than the neighboring glass-door track, then follow the underside of the lower rail across the opening.
Compare the left end, center, and right end using the same reference surfaces. Measurements can record a change, but there is no universal gap dimension that establishes whether every screen fits correctly. Look for a continuous intended overlap or closure behind the visible clearance.
Next, move the screen slowly through its normal travel. If the clearance changes at a particular track location, inspect that location before changing the entire panel height. If it stays similar throughout travel, panel position or the bottom closure detail deserves closer attention. Neither observation confirms a cause by itself.
Remove accessible loose grit with a soft brush or vacuum, then inspect again. If packed deposits obscure the running surface, follow the guidance for cleaning a sliding screen-door track before judging the fit. Cleaning may expose the problem without correcting it.
Look for an existing bottom insert only if the door’s design includes one. Keep the panel installed for these observations, and stop moving it if it rocks out of its guide or feels insecure. Check unstable seating before continuing the gap diagnosis.
How to Separate Alignment, Wear, Debris, and Installation Causes
Match the next check to the strongest observation. A gap that began after adjustment deserves a different first response from one on a replacement panel that has never fitted.
| Observation | Possible explanation | Next check |
|---|---|---|
| Opening appeared after adjustment | Panel height changed | Compare the current fit with model instructions and the previous setting |
| Clearance changes along the travel path | Debris, track variation, or a seating problem | Inspect the corresponding track location |
| Original bottom closure is missing or displaced | Closure component cannot perform its intended role | Verify the specified part and attachment |
| Replacement screen has never fitted both upper and lower interfaces | Panel or hardware incompatibility | Check model, opening, and panel specifications |
When Panel Position Explains the Opening
Suppose the screen was recently raised to stop scraping, and the continuous bottom opening appeared immediately afterward. That sequence makes excessive height a useful working explanation. Confirm that the panel is correctly seated and its intended bottom closure is present before reversing the adjustment.
The reason it scraped also matters. If raising the panel merely allowed it to clear packed debris, cleaning may permit a return to the previous setting. If a damaged track or frame caused the interference, lowering it again brings back the original problem.
Wear becomes relevant when it produces observable behavior: a corner loses height, the setting does not hold, or the panel travels inconsistently. Those clues justify investigating hardware. They do not justify replacing rollers solely because daylight is visible below the rail.
When Adjustment Cannot Restore the Fit
If the door originally used a bottom insert and that insert is absent, lowering the bare frame until it nearly touches the track cannot recreate the intended closure. It may introduce scraping while leaving the component problem unresolved.
The comparison below applies only to a sliding-screen design that uses an original bottom brush insert. An empty-looking channel on an unfamiliar door is not sufficient evidence of a missing part; confirm it against the model’s documentation.

For a replacement screen that has never fitted, verify the panel size and compatible track arrangement before modifying anything. Nominal width and height alone may not establish compatibility; the roller arrangement, frame profile, and guide relationship also matter.
If the panel cannot close the bottom opening while remaining properly engaged at the top, it has reached a fit limit. Further adjustment cannot compensate for an incompatible panel or missing component.
The Lowest-Risk Correction to Try First
Choose the first correction from the evidence: remove obstructing debris, correct a confirmed height error, or restore a verified original component. Do not combine changes—you need to see which one affects the opening.
When debris is present, clear what you can reach without dismantling the assembly and repeat the observation. Avoid bending the track or forcing a tool underneath the frame to make it sit differently.
If the panel is correctly seated and demonstrably too high, record its starting position before making a small, manufacturer-directed height correction. Use only identified adjustment screws. Nearby screws may hold frame corners or other hardware together.
For a compatible roller-adjusted design, the procedure for adjusting sliding screen-door rollers covers the hardware work. Check whether a small change improves the bottom fit while preserving guide engagement and free movement.
Observe actual panel movement after each change. Do not assume a universal screw direction or that equal turns on both sides produce equal movement. Stop if the rail scrapes, the panel becomes unstable, the screw turns without an effective change, or the adjustment reaches its limit. Reverse a change that worsens the fit instead of compensating with another adjustment elsewhere.
If an original bottom component is displaced or missing, confirm its profile and attachment method before restoring it. A thick adhesive strip may span the opening but drag, peel, or interfere with travel.
Keep caulk and expanding foam away from this moving interface and leave drainage openings clear. Damaged hardware or uncertain panel compatibility calls for model-specific repair assessment.
How to Test the Screen or Door After Each Change
Accept the correction only after the screen passes a full travel test. A gap that disappears when the door is closed may return—or become a scrape—as the panel moves.
- Bottom fit: With the screen closed normally, check that the intended overlap or contact is restored across the lower edge.
- Travel: Move it through its full normal path without scraping, lifting, or forcing.
- Guide engagement: Confirm that the panel remains securely captured during movement.
- Closing: Check that it closes and latches without being lifted into position.
- Repeatability: Recheck the upper edge and repeat normal operation to see whether the fit holds.
If lowering the panel improves the bottom but exposes a gap at the top of a sliding screen door, stop lowering it. The smaller bottom opening does not make that adjustment successful.
Visual inspection can identify an obvious passage, but it does not certify exclusion of every insect size. Aim for the closure intended by the door’s design, with sufficient clearance for normal movement.
Once the screen closes correctly and travels securely, leave the adjustment there. If those conditions cannot coexist, the next step is checking the specified panel and components—not tightening the fit further.
For applicable Milgard screens, consult the manufacturer’s sliding screen-door adjustment instructions.