
Roller adjustment is not mainly about making a sliding screen door roll faster. It is about placing the panel at the height where three conditions work together: both lower corners remain guided, the top edge has operating clearance, and the latch side meets the jamb correctly.
That distinction matters because changing one lower roller also tilts the entire lightweight panel. A large blind adjustment may lift a dragging corner while creating upper-channel binding, weakening engagement at the opposite corner, or moving the latch away from its keeper.
This job is appropriate only when the door is otherwise usable and the problem appears to be a minor height or alignment issue. Record the starting fit, adjust one corner slightly, and test the complete panel before making another change. Broken rollers, seized adjustment hardware, and bent tracks belong to different repairs.
Preparing for Roller-Height Adjustment on an Otherwise Usable Sliding Door
The first decision is whether the door still behaves like an adjustable door. If it remains supported and travels through the opening under its own rollers, a small height correction may be appropriate. If it must be carried, repeatedly lifted, or forced, continued adjustment can hide the actual failure rather than correct it.
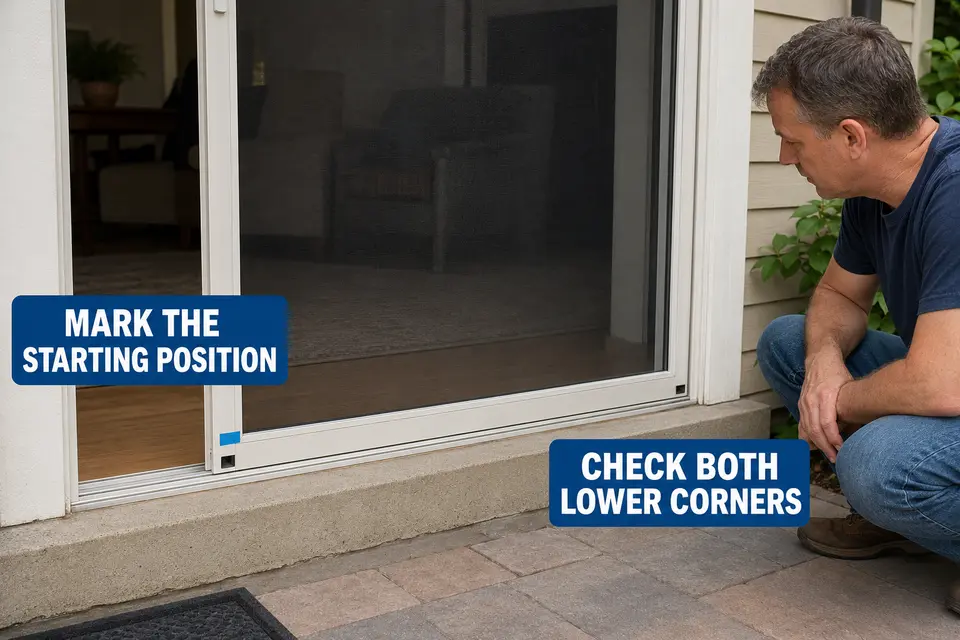
Move the installed door slowly through its full travel using the handle. Watch both lower corners and note where the resistance appears. Then close it and compare the top and bottom gaps along the jamb.
Useful adjustment clues include:
- One lower corner dragging lightly.
- The panel meeting the jamb at a slight angle.
- The latch sitting a little above or below its keeper.
- A small clearance difference between the lower corners.
Adjustment is less likely to help when resistance remains heavy across most of the opening, a roller no longer supports its corner, or the panel must be lifted whenever it closes. Those broader symptoms call for a separate look at why a sliding screen door remains hard to open.
Inspect both lower frame corners for adjustment openings. Depending on the door, an access hole may be positioned on the face or edge of each corner. A separate frame-assembly screw may also be nearby, so do not loosen a screw merely because it is visible. Use the door’s construction or manufacturer documentation to identify the adjustment point when possible.
Mark the starting panel position with removable painter’s tape. You can also mark the initial orientation of the screwdriver slot on the tape. This provides a reliable path back if the first change makes the fit worse.
Practical note: Adjustment direction varies among roller assemblies. Test with a very small movement and watch that corner instead of assuming clockwise always raises it.
Tools and Materials for This Specific Job
Tool fit matters more than tool quantity. A correctly fitting screwdriver lets you feel whether the adjustment mechanism is moving normally; an undersized or loose tip can damage the screw head before the roller position changes.
Prepare:
- A screwdriver or driver bit that fits the adjustment screw precisely.
- A flashlight for recessed access holes.
- Removable painter’s tape for reference marks.
- A clean soft cloth or thin cardboard for finished surfaces.
- A vacuum or soft brush for loose track debris.
- Work gloves if the frame has accessible sharp metal edges.
A second adult can help steady a large or awkward panel, but that person should hold a rigid frame member rather than pull on the screen mesh, latch, or handle.
Do not use greater leverage to overcome a screw that resists reasonable hand pressure. A seized mechanism is a stop condition, not an invitation to use a larger driver. Pry bars, metal wedges, and heavy lifting equipment are also unnecessary for routine roller-height adjustment and can deform the frame.
How to Protect the Frame, Finish, and Surrounding Parts
The frame must remain square enough for every movement check to mean something. Supporting one corner aggressively can temporarily change the door’s shape, making an incorrect roller setting appear successful until the panel is released.
Hold the door by a rigid vertical or horizontal frame member. Never lift or control it by the screen mesh. Place a clean cloth or thin cardboard between tools and nearby painted thresholds, vinyl jambs, aluminum surfaces, or glass. Check the padding for embedded grit before it touches the finish.
If the selected corner needs to be unloaded slightly so the adjustment screw can move, steady the panel without suspending its full weight. Do not rest it on the latch, handle, or one narrow frame corner, and keep fingers away from the lower roller-track pinch point.
Keep the door inside its normal guides during the work. Aggressively lifting it for access changes the panel position and can place unnecessary stress on the opposite corner. The useful adjustment is the one that works after all temporary support has been removed.
Clearance, Tension, or Movement Checks During the Work
Each adjustment must earn the next one. If a small change improves the dragging corner but worsens upper clearance or latch alignment, the correct response is not automatically another turn in the same direction.
Use this sequence:
- Record the starting fit. Close the door and compare its top and bottom gaps at the jamb. Note the dragging point and the latch position. These observations define what the adjustment must improve.
- Select the corner requiring correction. Begin with the corner connected to the visible height problem. Do not change the opposite roller merely to keep both screw positions visually equal.
- Make one small adjustment. Slightly unload the selected corner if necessary, then turn the adjustment screw approximately one-quarter turn. Observe whether the corner rises or lowers before continuing.
- Move the door gently. Roll it through part of its travel using the handle. This allows the roller to settle and reveals whether the change reduced resistance or created a new drag point.
- Compare the entire panel. Recheck both lower corners, upper clearance, frame tilt, and latch position. Raising one corner changes the panel diagonally, so the effect does not remain at that roller.
- Repeat only when the evidence supports it. Make another small change only if the same corner remains low and the first adjustment improved the overall fit without reducing track engagement or creating upper-channel pressure.
The target is not maximum roller tension. The panel needs enough lower-track engagement to remain guided while retaining clearance in the upper channel. Raising both corners indiscriminately can squeeze the door vertically even when it appears more level.
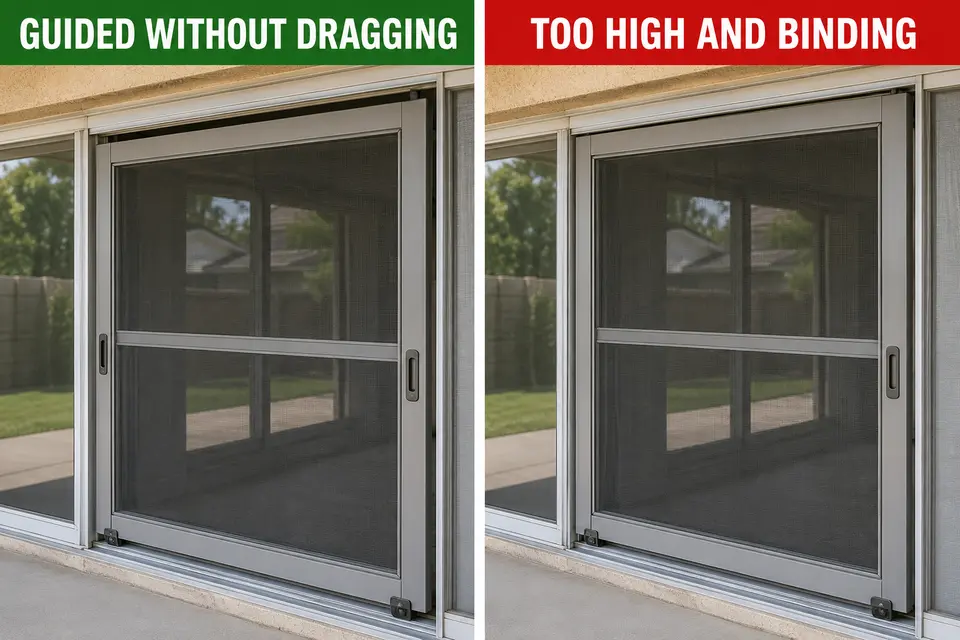
Stop if an adjustment screw spins without changing the corner height, will not move with reasonable pressure, or allows the corner to drop again. Those responses point beyond normal height setting.
Also stop if one lower corner repeatedly escapes during ordinary travel. That behavior requires the focused checks used when a sliding screen door keeps coming off the track, not a series of increasingly large height adjustments.
Common setup-order mistakes include:
- Turning several revolutions before testing the result.
- Raising both corners when only one corner sits low.
- Judging the setting while someone is still lifting the panel.
- Continuing to adjust after the screw stops producing a stable height change.
The Final Test Before Calling the Repair Complete
The final test must happen with the door carrying itself. Remove temporary padding, tape references, and tools from the opening before deciding whether the adjustment worked.
Open and close the door through its complete travel several times using only the handle and ordinary operating force. Watch both lower corners. Neither should drag, bounce, climb, or leave its guide. Listen for scraping that appeared only after the adjustment.
Close the door gently and observe how the vertical frame meets the jamb. Test the latch without lifting the panel or pushing it sideways. A door can roll easily and still be set incorrectly if the latch side no longer meets the opening cleanly.
Before calling the work complete, confirm that:
- The door travels fully without a pronounced drag point.
- Both lower corners remain guided.
- The top edge moves without binding in the upper channel.
- The panel meets the jamb reasonably evenly.
- The latch works without lifting or forcing the door.
A slight variation in rolling effort across an older track does not automatically justify raising the door again. The adjustment is complete when travel, guidance, upper clearance, and latch alignment improve together.
If the height will not hold, severe resistance remains, a corner repeatedly leaves the track, or visible roller or track damage controls the movement, stop adjusting. The last screwdriver turn does not complete the repair; the first full operating test that works without assistance does.