The screen door swings toward the frame, slows near the jamb, and stops before the latch clicks. The first useful distinction is whether gentle assistance finishes the movement smoothly or reveals resistance.
That determines where the correction belongs. Scraping, lifting, or a hard push points toward the door’s closing path. Smooth manual closing shifts attention toward the closer’s hold-open mechanism, setting, mounting arrangement, or condition.
Turning the speed screw before making that distinction can make the door hit harder while leaving the actual problem in place. Start by watching the stopping point. If the hardware is intact, use the handle to gently check the remaining travel without forcing the door.
The Likely Causes of Closer That Stops Before The Latch Engages
A door that moves freely through most of its swing can still meet enough resistance near the jamb to stop short. That is where weatherstripping begins to compress, the door approaches its stops, and the latch meets the strike.
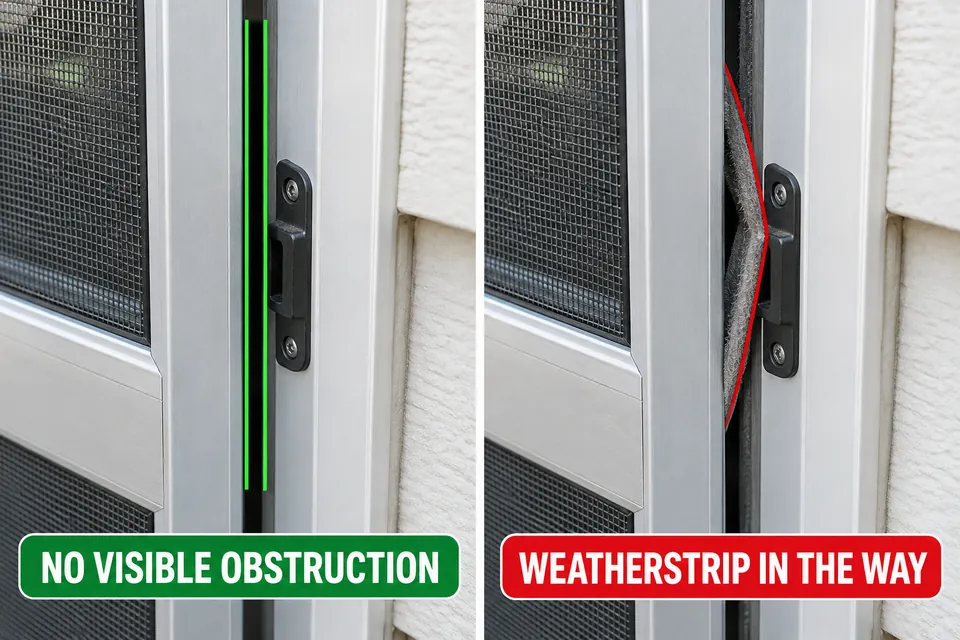
Loose debris or folded weatherstripping may interrupt that final movement. A door edge rubbing the frame creates a separate repair need: asking the closer to push harder leaves the contact unchanged.
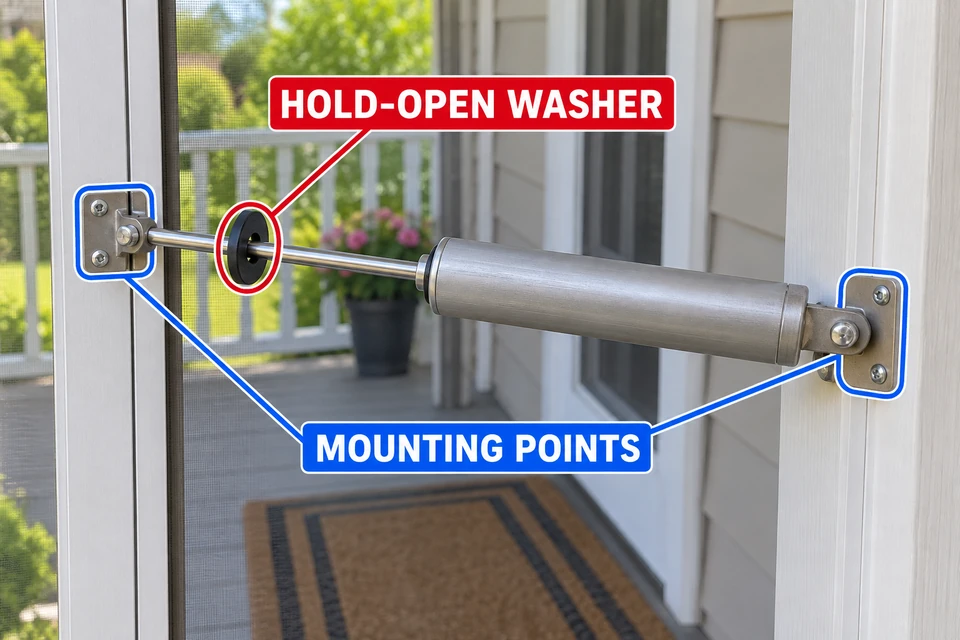
The closer can also limit travel. A hold-open washer that has not released, an unsuitable replacement unit, or altered mounting geometry may prevent an otherwise usable mechanism from finishing the swing.
Watch whether the door stops completely or continues creeping toward the latch. Continued slow movement makes closing-speed adjustment worth considering after obstructions are excluded. An abrupt, repeatable stop makes contact or binding a useful first check. Neither observation proves a cause by itself.
Internal wear remains possible, particularly when performance has deteriorated gradually. However, the speed valve regulates pneumatic damping; it cannot restore a worn or failed spring.
What Changed Before the Symptom Started
Use the last change to choose your first inspection. A door that stopped latching immediately after new weatherstripping deserves a different starting point from one caught by a gust.
After painting or replacing weatherstripping, inspect the contact surfaces. Paint may stick where surfaces meet; a new seal may be folded, poorly seated, or too bulky for the clearance. More closing speed does not correct that fit.
After closer replacement or bracket work, compare the arrangement with the exact model’s instructions. Reusing old screw holes does not establish that the new closer has the correct mounting geometry.
If the symptom began immediately after a speed adjustment, that setting becomes relevant—but only after checking that the door still moves freely.
After wind caught the door, inspect the rod, brackets, and fastenings before operating it again. Gradual deterioration calls for a comparison: has the closer’s behavior changed, or has the door started rubbing?
If incomplete closing happens only during gusts, repeat the observation in calm conditions before changing a setting. Otherwise, you may adjust for a temporary wind load and create excessive closing speed when the wind drops.
How to Separate Alignment, Wear, Debris, and Installation Causes
Find out what happens during the remaining travel before choosing a correction. The observations below narrow the cause; they do not identify a failed internal component.
| Observation | What it suggests | Next check |
|---|---|---|
| Gentle assistance closes and latches the door smoothly | Closer setting, geometry, or internal condition deserves attention | Inspect the closer and compare its instructions |
| Door scrapes or needs lifting or a hard push | Door-path resistance or alignment | Stop closer adjustment and address that separate problem |
| Door reaches the frame but the latch does not engage | Latch engagement trouble | Move to latch diagnosis |
| Rod or bracket visibly binds or shifts | Installation or hardware trouble | Stop testing if mounting is insecure or damage is present |
Check the Last Part of the Door’s Travel
Work in calm conditions. Keep fingers away from the closing edge, rod, and mounting joints. If a bracket is pulling away or the rod is visibly damaged, skip the movement check.
Otherwise, use the handle to gently assist the door through the point where it normally stops. Do not shove it or lift it into place.
Notice where resistance begins. A scrape points toward contact. Springy resistance as the door meets the jamb may involve weatherstripping. If the door reaches its normal closed position but the latch fails to catch, investigate latch engagement rather than trying to increase closer travel.
Smooth closing with light assistance shifts attention toward the closer, but remains a screening observation. Even a small amount of hand pressure can overcome resistance that matters during unassisted closing.
Inspect the Closer Without Disconnecting It
Check that the hold-open feature is released using the procedure for its design. Some pneumatic closers use a sliding washer; others use a button or another mechanism. Do not pry a stuck mechanism or assume every model releases the same way.
Look along the exposed rod for obvious bending. Inspect mounting points for missing hardware, gaps, or signs of movement. If an attachment shifts during a normal closing observation, stop further testing.
Leave the closer connected. Removing pins or opening the cylinder is unnecessary for these external checks and introduces spring-loaded hardware into a simple inspection.
Match the Correction to the Evidence
Remove loose debris from accessible closing surfaces. If weatherstripping has slipped from its retaining channel, restore it only if it seats normally without modification. Do not cut away sealing material simply to overcome closing resistance.
For a recently installed closer, verify its intended door application and mounting arrangement. Some models have specific latching configurations, so moving attachment points by trial and error can introduce another variable without resolving the original problem.
Once resistance and visible damage have been excluded, follow the model’s instructions to adjust the pneumatic closer’s closing speed. Make only the permitted small change, then test the entire closing movement.
If the adjustment merely makes the door hit harder, return to the contact and installation checks. A harder impact is poor evidence that the cause has been corrected.
When Adjustment Will Not Rescue a Failed Part
Stop adjusting when the evidence points to damaged hardware. A bent rod, cracked bracket, or mounting point pulling out of the door needs repair; another speed change cannot correct it.
Internal failure becomes more plausible when the closing path appears clear, the closer is appropriate and installed correctly, and permitted adjustment does not restore normal operation. External checks usually cannot identify the exact spring, seal, or internal mechanism responsible.
Do not remove the valve screw, open the cylinder, bend the rod back, or add an improvised spring to increase closing force. Those actions go beyond a bounded homeowner correction.
Damaged or insecure attachments must be repaired before further closing tests. If replacement is needed, match the closer to the door and its application requirements. A new unit installed with the same unsuitable geometry may reproduce the same failure.
How to Test the Screen or Door After Each Change
A useful correction must work without your hand supplying the final push. Test the complete hinged screen-door assembly under consistent conditions so each change produces a meaningful comparison.
Use this short closing check:
- Make one change, leaving unrelated settings alone.
- Open the door to a normal, repeatable position within the closer’s permitted travel.
- Release it without pushing toward the frame, and remain clear of the swing.
- Watch the full movement and confirm the latch catches; gently check the handle without operating the latch release.
- Repeat from another ordinary opening position, checking for scraping, stalling, or slamming.
A door that latches only after a shove or while being lifted has not passed. Excessive impact is also a failed result. If the screen door now slams shut, address that changed symptom before accepting the adjustment.
When the door still stops short, follow the evidence back to the limiting point. Contact belongs at the door or seal; smooth travel with ineffective closing action belongs at the closer’s installation, settings, or condition. Accept the correction only when the door closes and stays latched repeatedly without assistance.
For an example of model-specific latching arrangements, see the Wright Products V170 pneumatic closer instructions.